

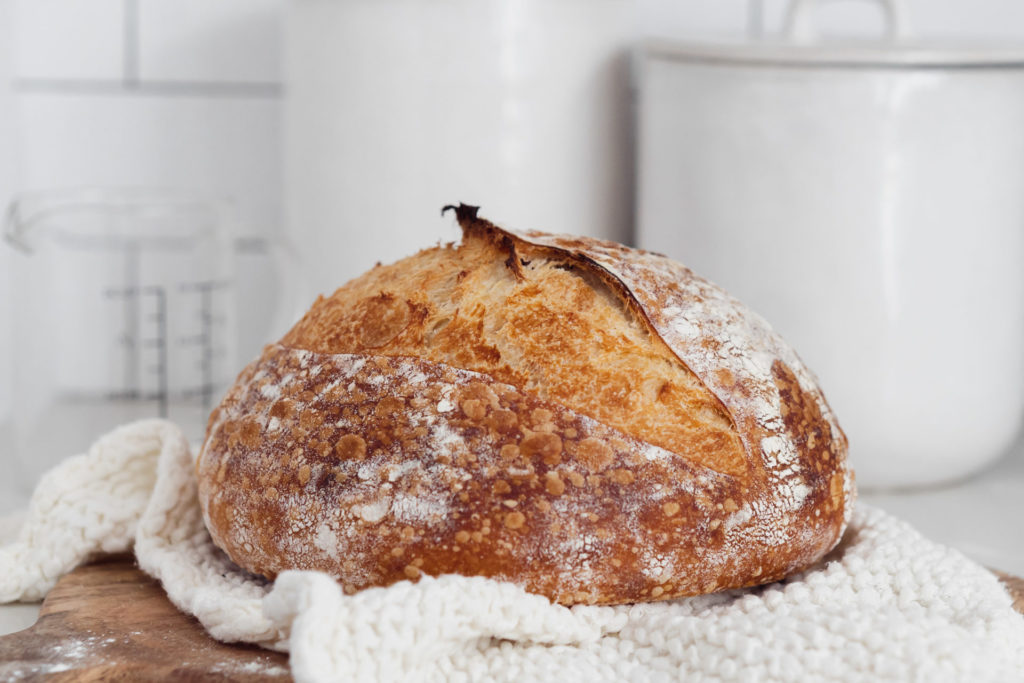
Crusty, homemade bread is one of life’s greatest pleasures! And there’s a very real sense of accomplishment that comes from making it yourself. Working with sourdough is a learning curve, but once you get the hang of things, it begins to feel like therapy. (It is also much more intuitive than it may seem from reading a recipe full of grams and hydration percentages).
Tartine Bakery
Tartine Bakery is one of my favorite stops in San Francisco (morning bun and banana cream pie for me!). I bought Tartine Bread years ago solely because it was beautiful, and I am a beautiful cookbook junkie. Once I opened it up and learned the first step to making bread like my favorite bakery is to spend weeks cultivating a sourdough starter, I closed the book and put it on my shelf for the better half of a decade. Last year, I finally made a sourdough starter of my own, then opened the book back up and learned to make the best bread of my life.
Now, I’m here to try and convince you to do the same thing. I recommend finding a friend to borrow some starter from so you don’t have to wait weeks to start baking. If you’re local to Orange County, come grab some of mine!
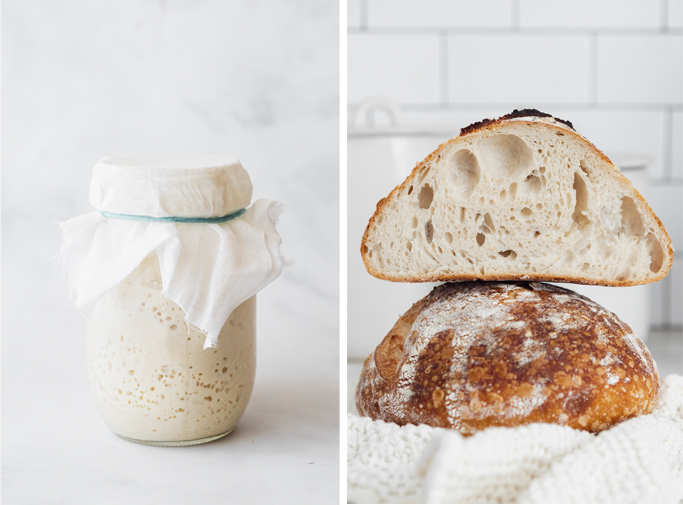
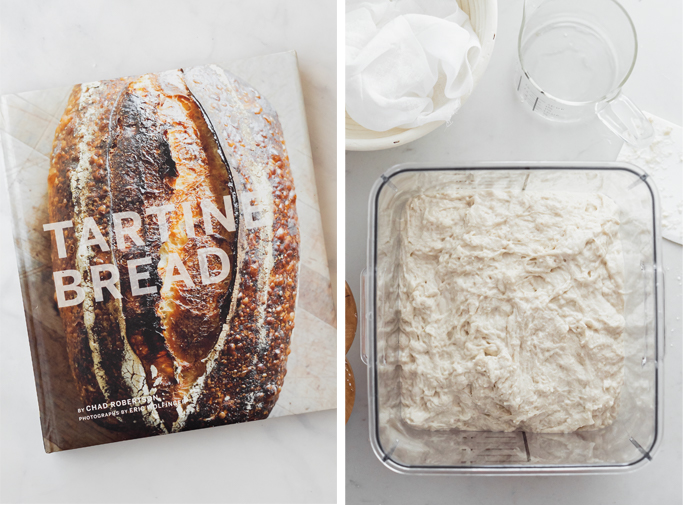
I’ve tried a few different sourdough bread recipes, and have had the most success with Tartine’s Basic Country Bread. If you really want to dive in, I totally recommend getting the book and reading through all of it. The recipe spans 40 pages in the book, and has helpful photos to guide you through all of it. I’ve done my best to condense it, but I think it’s so helpful to read all of it! The more you learn about the process, the easier it is to troubleshoot as you bake in different conditions. I’m also happy to answer any questions you might have!
Bread Baking Equipment
There are a handful of things you will need to make things go as smoothly as possible:
- Kitchen scale – bread recipes measure flour, water, and even salt in grams, which makes an accurate scale essential. I use and love this one.
- Thermometer to measure the temperature of the water; and the temperature of the dough as it proofs if you really want to get technical!
- Container to proof the dough in – you can use any large bowl, but having a thick, transparent, glass bowl or plastic container helps keep the temperature of the dough regulated, and lets you keep an eye on how much it has risen and how many bubbles have developed so you have a better idea of when the dough is ready. I use this container.
- Dough scraper and bench knife both only cost a few dollars and make handling and shaping the dough much easier.
- Proofing baskets or “bannetons” to hold the dough’s shape for the final rise.
- A couple of basic tea towels if your proofing baskets don’t have liners.
- Razor blades to score the bread – these are cheap and give you more control and less drag than a kitchen knife.
- A heavy dutch oven or cast-iron combo cooker to bake the bread in. You need something that will get and stay hot, that will fit your bread and close completely to trap steam inside. I started out using my cute dutch oven, but heating it to 500′ over and over was making it look pretty beat up pretty quickly. I ended up buying the Lodge combo cooker and I love it. The shallow bottom makes it easy to dump the dough in and score it without worrying about burning my forearms on the side of a tall dutch oven.
Okay, let’s make some bread!

Tartine’s Country Bread
Ingredients
Levain
- 1 tbs sourdough starter
- 100 g white bread flour
- 100 g whole wheat bread flour
- 200 g warm water 78'
Country Bread
- 200 g levain
- 700 g warm water 80'
- 900 g white bread flour
- 100 g whole wheat bread flour
- 20 g salt
- 50 g warm water 80'
- more flour, for shaping white flour or bread flour will both work
- rice flour, for lining the proofing basket optional – can use all normal flour in place of rice flour
Instructions
Mixing the Levain
- The night before you want to make bread, mix your levain ingredients in a medium bowl and cover with a tea towel overnight. It will expand considerably, so be sure to use a bowl with room for the levain to grow.
- The next morning, your levain should increased in volume by about 20 percent, and have lots of little bubbles (signs of yeast activity). Test your levain by placing a small spoonful into a cup of room temperature water – if it floats, it is ready to bake with. If it sinks, let it continue fermenting until it passes the float test. You can speed this process up by placing it into a warm place.
Autolyze
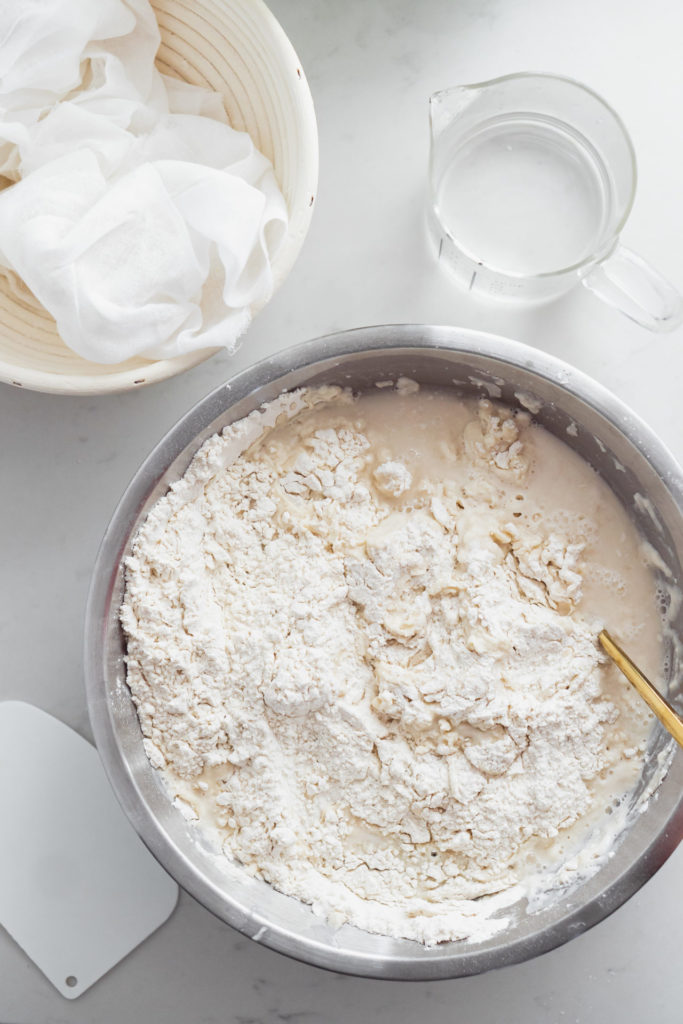
- Pour 700 grams of 80' water into a large mixing bowl. Add the 200 grams levain and mix to disperse.
- Add 900 grams white bread flour and 100 grams whole wheat bread flour and mix thoroughly by hand until no dry flour remains. (The dough scraper is helpful to remove dough from your hands after mixing).
- Let dough rest for 25-40 minutes.
Bulk Rise
- After the resting period, add 20 grams salt and 50 grams of 80' water to dough. Incorporate by squeezing the dough with your hands. It will break apart, then re-form as you turn it in the bowl.
- Transfer dough to a thick, clear glass or plastic container for the bulk rise. The dough will take 3 to 4 hours to complete its bulk rise if it is at a constant temperature of 78 to 82'. If your kitchen is much colder than this, it will take longer; if it is warmer, it will take a shorter amount of time. If you are working in a cold environment, you can raise the temperature of the water, like 90', or place the dough in a warm spot – like inside of your oven with a small pot of boiling water. If it is especially warm inside your home, you can mix the dough with cooler water to slow down the fermentation.
- Let the dough rest for 30 minutes, then give the dough its first "turn". Dip one hand in water, then slide your hand under the dough, grab its underside, stretch it up, and fold it back over the rest of the dough. Repeat this two or three times (I use a square container and like to stretch the dough then fold it four times, turning the container 1/4 turn after each stretch and fold to ensure all of the dough gets evenly developed).
- Set a timer for another 30 minutes, then give the dough another turn. Repeat two more times, so that the dough is stretched and folded four times, once every 30 minutes, until two hours have passed. You should notice the dough becoming smoother and softer at each turn.This may seem like a lot of work, but it only takes seconds to do each stretch and fold – so you really just need to be sure to set a timer and then it isn't much work at all!
- Let the dough continue resting, untouched, until it has completed its bulk rise, about 1 to 2 hours longer (this could be much longer in colder conditions). You will know the dough is ready when it is billowy, soft, and aerated with gas bubbles. It's volume will have increased by 20 to 30 percent, and when you lightly press a wet fingertip into the dough, the indent should pop back up slowly and leave only a small indent.
Shaping
- When the dough has completed its bulk rise, use a dough scraper to pull the dough out of the container onto an unfloured counter. Lightly flour the top of the dough, then use a bench knife to cut the dough in half and flip each upside down, so its floured side is down.
- Fold the cut side of each piece of dough onto itself so that the flour on the surface of the dough is sealed on the outside of the loaf.
- Using a bench knife and one hand, gently shape the dough into a round shape. Let the dough stick to the counter as you slide the bench knife underneath and rotate it, until a smooth round forms.
- Let both rounds rest on the counter for 20 to 30 minutes. After this time, they should have relaxed onto the counter and spread into a thick pancake shape. The edges should appear fat and rounded, not tapered or spreading too much. If the dough is spreading too much and the edge is flat, it is likely the dough did not develop enough. To correct this, shape each round a second time and let rest for another 20 to 30 minutes before proceeding.
- To form the final loaves, lightly flour the top surface of the dough rounds. Slip the bench knife under each round to lift it off the counter, taking care to maintain its round shape. One at a time, flip the rounds over so the floured side is now resting on the work surface. What was the underside should now be facing up.
- Working with one round, and taking care not to deflate the dough, fold the third of the dough closest to you up and over the middle third of the round. Stretch the dough horizontally to your right and fold this right third over the center. Then stretch the dough horizontally to your left and fold this left third over the center.
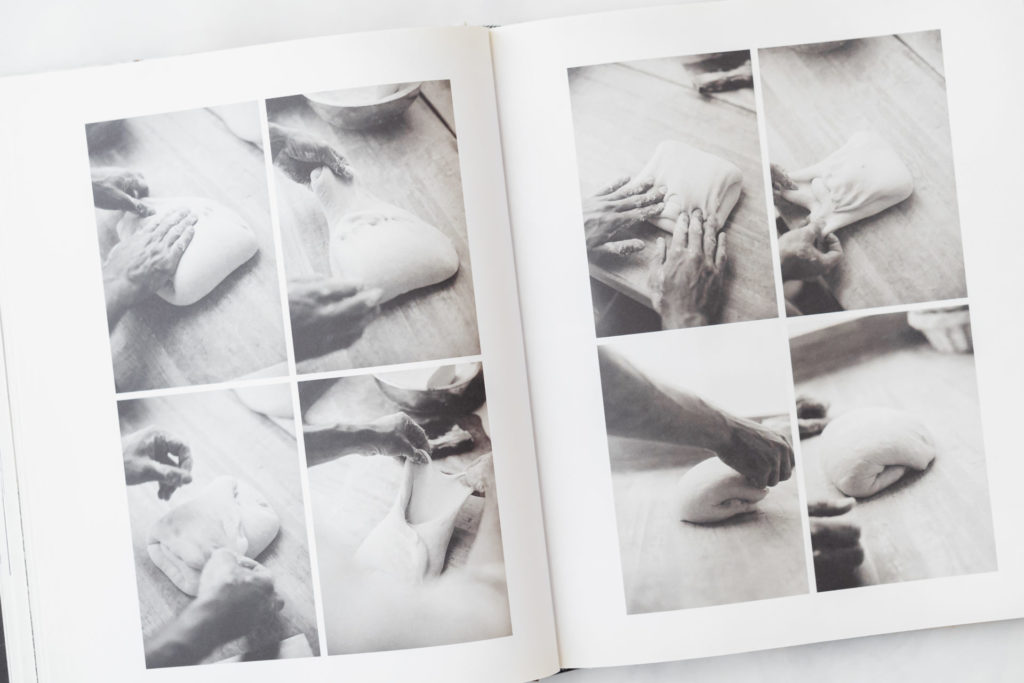
- Stretch out the third of the dough farthest from you and fold this flap toward you, over the previous folds, and anchor it in place with your fingers. Then grab the dough nearest to you and wrap it up and over, while rolling the whole package away from you so that the smooth underside of the loaf is now the top and all the seams are on the bottom (reference photos pictured from book above to see the final shaping).
- Cup your hands around the dough and pull it toward you, rounding it against the work surface to tighten the tension and stretch the outer surface to close the seam. Let the shaped loaf rest for a minute and repeat with the remaining round.
- Line your proofing baskets with tea towels and a generous 50/50 mix of flour and rice flour to prevent sticking.
- Using the bench knife, lift each shaped loaf off the counter and transfer to the lined basket so that the smooth side is down and the seam is centered and facing up.
Final Rise
- The loaves will complete their final rise in the proofing baskets. They can either sit at room temperature for 3 to 4 hours before baking, or be transferred to the fridge for up to 12 hours (Tartine says 12, but I have kept loaves in the fridge for up to 16 hours and baked with no problem).
Baking the Loaves
- Twenty minutes before you are ready to bake, place your dutch oven or combo cooker in the oven and preheat to 500'. If your loaves are in the fridge, pull one out to sit on the counter as the oven preheats.
- Using heavy oven mitts and exercising extreme caution, remove the dutch oven from the oven and remove the lid. Carefully invert your basket and dump the loaf of bread into the dutch oven (this can take some practice to do gracefully!).
- Using a sharp knife or razor blade, score the bread however you like. This helps steam release so the bread does not burst open spontaneously as it bakes.
- Cover the dutch oven and return to the oven. Immediately turn down oven heat to 450'.
- Bake for 20 minutes, then remove lid of the dutch oven and continue baking for another 20 to 25 minutes, until crust is deeply caramelized in color. Remove pan from oven and transfer loaf to a cooling rack. Wipe out the inside of the dutch oven and place back into oven.
- Raise oven temperature to 500' and repeat baking process with second loaf.
Comments +